


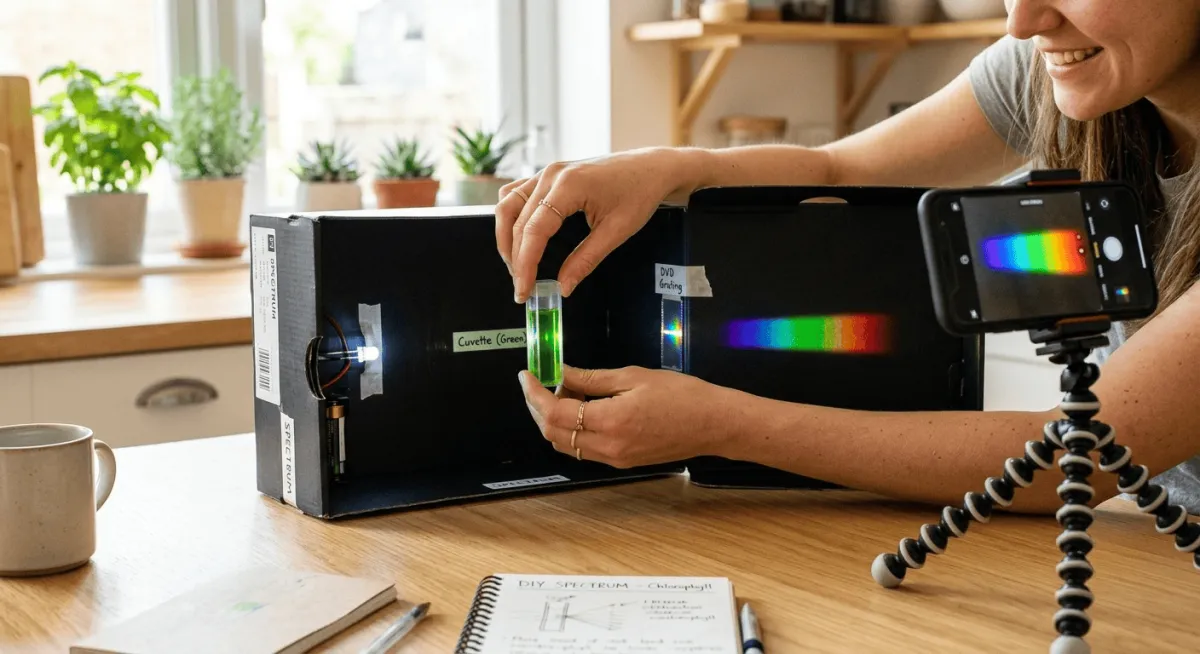
How to Build a Simple DIY Spectrophotometer for Citizen Science
Hey there, friend! Have you ever looked at a glass of water and wondered what’s really in it?
Or maybe you’ve watched leaves change color and wished you could measure the pigments yourself. That curiosity is the heartbeat of citizen science, and today, I’m going to show you how to build your very own DIY spectrophotometer to turn those questions into real data.
This project is surprisingly simple, wonderfully nerdy, and you don’t need a lab coat or a degree to pull it off.
By the time you finish reading, you’ll have everything you need to start exploring the hidden spectrum of light all around you. So grab a cup of tea, and let’s dive in.
What Exactly Is a DIY Spectrophotometer and Why Should You Build One?**
Before we start cutting cardboard and taping things together, let’s talk about what you’re actually building.
A spectrophotometer is an instrument that measures how much light a liquid sample absorbs at different colors, or wavelengths. Shine a known light through a sample, split the light that comes out the other side into a rainbow, and see which colors got dimmed.
That dimming tells you what’s dissolved in there. It’s how scientists test water quality, measure chlorophyll in plants, or even identify food dyes.
A DIY spectrophotometer does the exact same thing, just with simple, affordable components.
Why build one? First, because you’re awesome and you love making things that actually work. But also, this is one of the most empowering citizen science tools you can have in your back pocket.
With your own device you can monitor local streams for pollutants, compare the chlorophyll content in different leaves, or even detect counterfeit olive oil (seriously).
When you build spectrophotometer projects yourself, you’re not just learning physics, you’re joining a global community of people using science to care for their own neighborhoods. No gatekeepers, no expensive labs. Just you and a bit of creative tinkering.
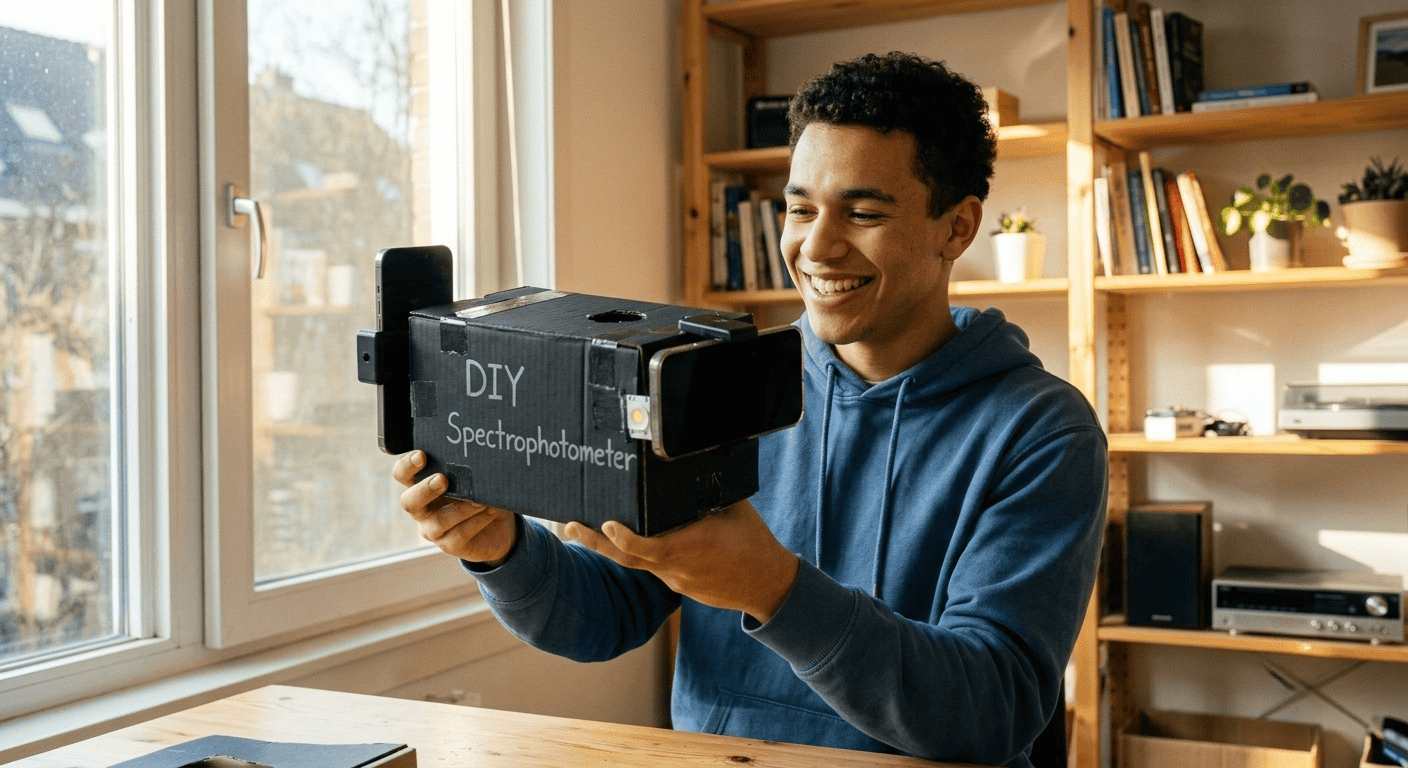
The Science Made Simple (No Jargon, I Promise)
I know the word “spectrophotometer” sounds intimidating, but the principle is something you’ve seen since you were a kid.
Remember splitting light with a prism or seeing a rainbow on a CD? That’s diffraction, and it’s the heart of how we split light into its constituent colors.
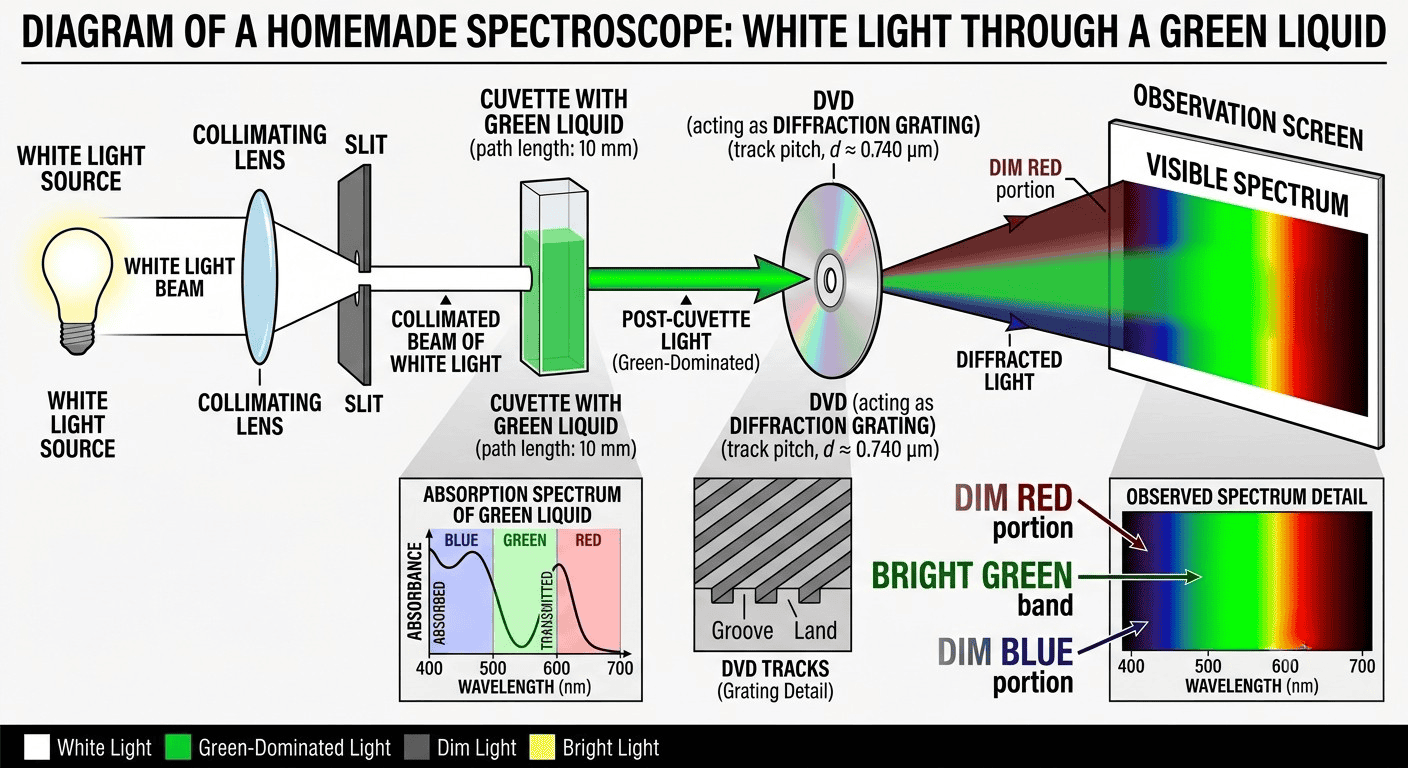
Your DIY spectrophotometer will use a cheap diffraction grating (like a piece of a DVD) to spread the light out, a light source to pass through your sample, and a way to detect which colors are missing after the light does its work.
Think of it this way: a blue liquid looks blue because it absorbs red and green light, letting blue pass through.
By measuring exactly how much red and green are missing compared to a plain water sample, you can figure out the concentration of the colored substance. It’s all about comparing the spectrum of a blank sample (called a “blank”) to your test sample.
Our homemade gadget will let you capture that spectrum with a smartphone camera or a simple light sensor, then analyze it with free software. It’s physics that fits on a kitchen table.
Gathering Your Supplies: A Scavenger Hunt for Citizen Science Tools
One of the best parts of this project is that most materials are already hiding in your home, or cost just a few dollars. Here’s what you’ll need to **build spectrophotometer** hardware that actually works:
A rigid box or enclosure: A shoebox, a cardboard box painted matte black inside, or even a wooden cigar box. The black interior reduces stray light.
A light source: A white LED works best because it emits a full rainbow of colors. A keychain flashlight or your phone’s LED flash can do the job. We want something consistent.
A diffraction grating: The easiest source? A blank DVD or CD-R. You’ll peel off the label and use the clear plastic layer with its microscopic grooves. A proper diffraction grating slide (1000 lines/mm) costs a couple of dollars online and gives sharper results.
A sample holder: A small glass cuvette or a clear, flat-sided vial. If you don’t have a cuvette, a small glass spice jar with parallel sides can work in a pinch.
A detector: Your smartphone camera is perfect. Alternatively, you can use a webcam or an inexpensive light sensor module (like the TSL2591) connected to an Arduino if you want to go the electronics route. For today’s build, we’ll focus on the smartphone method because nearly everyone has one.
Razor blade or craft knife, ruler, tape, glue, black paper, and a tripod or stack of books to hold your phone steady.
This whole kit fits in a shoebox and can become one of the most versatile citizen science tools you’ll ever use. I’ll link to a couple of my favorite sourcing spots later, but for now, start your scavenger hunt!
Step-by-Step: How to Build a DIY Spectrophotometer with a Smartphone
Ready to get your hands busy?
Let’s walk through this together. I’m going to describe the smartphone-based DIY spectrophotometer I’ve built and tested.
Don’t worry about perfection, this is all about experimentation.
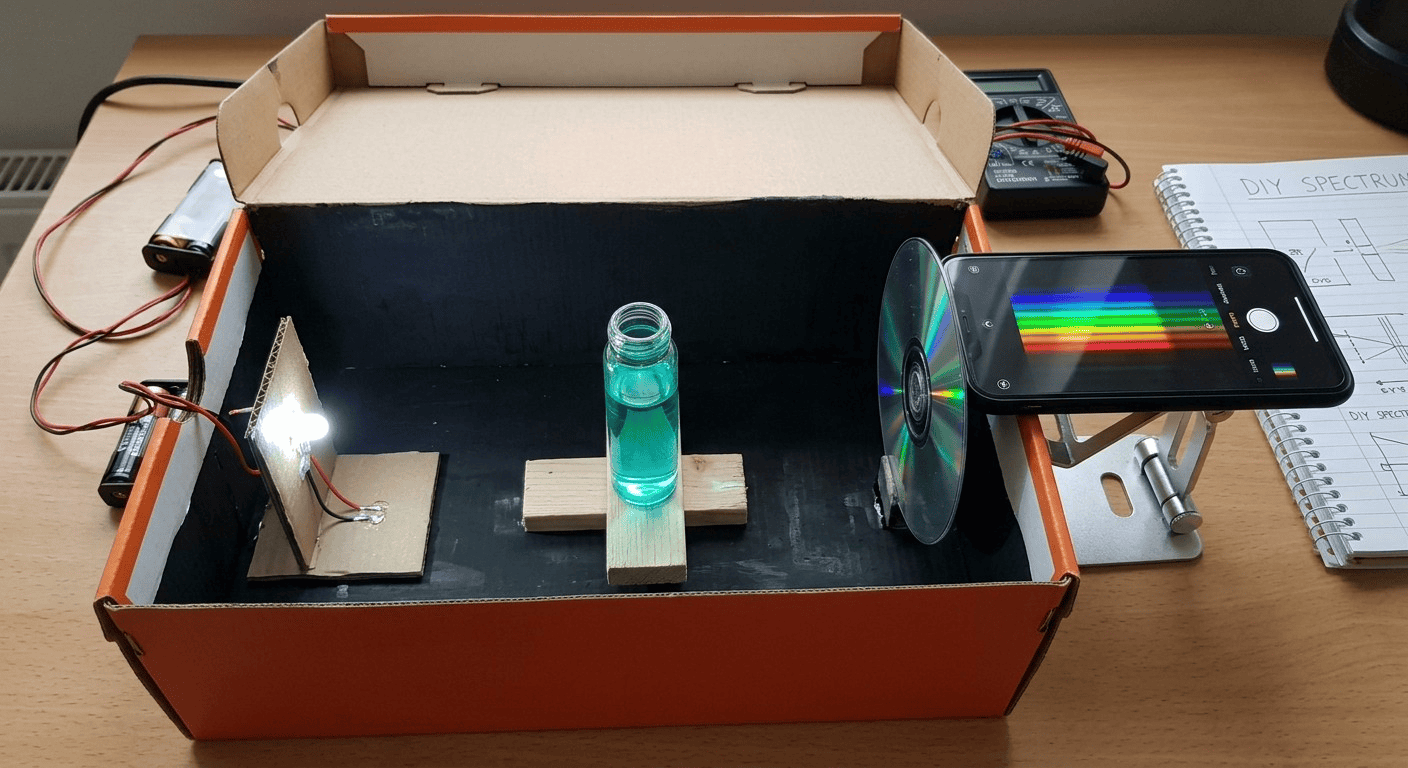
Prepare the enclosure. Take your box and paint the interior black or line it with black paper. Light loves to bounce around and mess up your readings, so the darker the better. Cut a small rectangular hole at one short end for the light source to shine in, and another on the opposite end where your diffraction grating and camera will look. The light goes in one end, passes through the sample, hits the grating, and spreads into a rainbow captured by your phone.
Mount the light source. Fix the white LED firmly at the entry hole so its beam shoots straight down the length of the box. I used hot glue to hold a small keychain light in place, with the button accessible outside or just left on. If you’re using your phone’s flash, cut a hole that fits your phone’s light, but I find a separate LED gives more control. Pro tip: insert a small piece of frosted plastic (like a cut-up milk jug) in front of the LED to diffuse the light and make it more even.
Build the sample compartment. About one-third of the way from the light source, cut a slot big enough to slide your cuvette or vial in and out. You want the light beam to pass through the liquid. Use black cardboard to make a snug holder so the vial stays vertical and the light path is fixed. This part doesn’t need to be elegant; it just needs to hold the sample consistently in the same spot every time.
Create the diffraction slit and grating. On the opposite end, cut a narrow vertical slit in a piece of black cardboard, about 1 mm wide and 5 mm tall. This slit sharpens the spectrum. Tape the diffraction grating (DVD piece) directly behind the slit, oriented so the grooves are vertical (parallel to the slit). The light that comes through the sample then passes through the slit and gets spread out sideways into a rainbow. You’ll peer at this rainbow with your phone.
Align and capture. Place your smartphone on a tripod or a stable stack of books, aiming its camera right at the diffraction grating. Open your camera app and position the phone so you see a clear, bright spectrum on the screen. You might need to shift the phone left or right to catch the first-order rainbow (the brightest one off to the side). Once it’s aligned, tape down a guide so you can reposition everything identically later. This alignment is the secret sauce, take your time.
(If you’re interested in adding an Arduino-based sensor instead of a phone for more precise readings, check out my guide to environmental sensors)
Choosing and Using Free Software for Analysis
Alright, you’ve got a rainbow picture on your phone. Now what? The magic happens when we turn that image into a graph of light intensity versus color. For a true DIY spectrophotometer, you need a way to analyze the spectrum. I’ll share two fantastic free options.
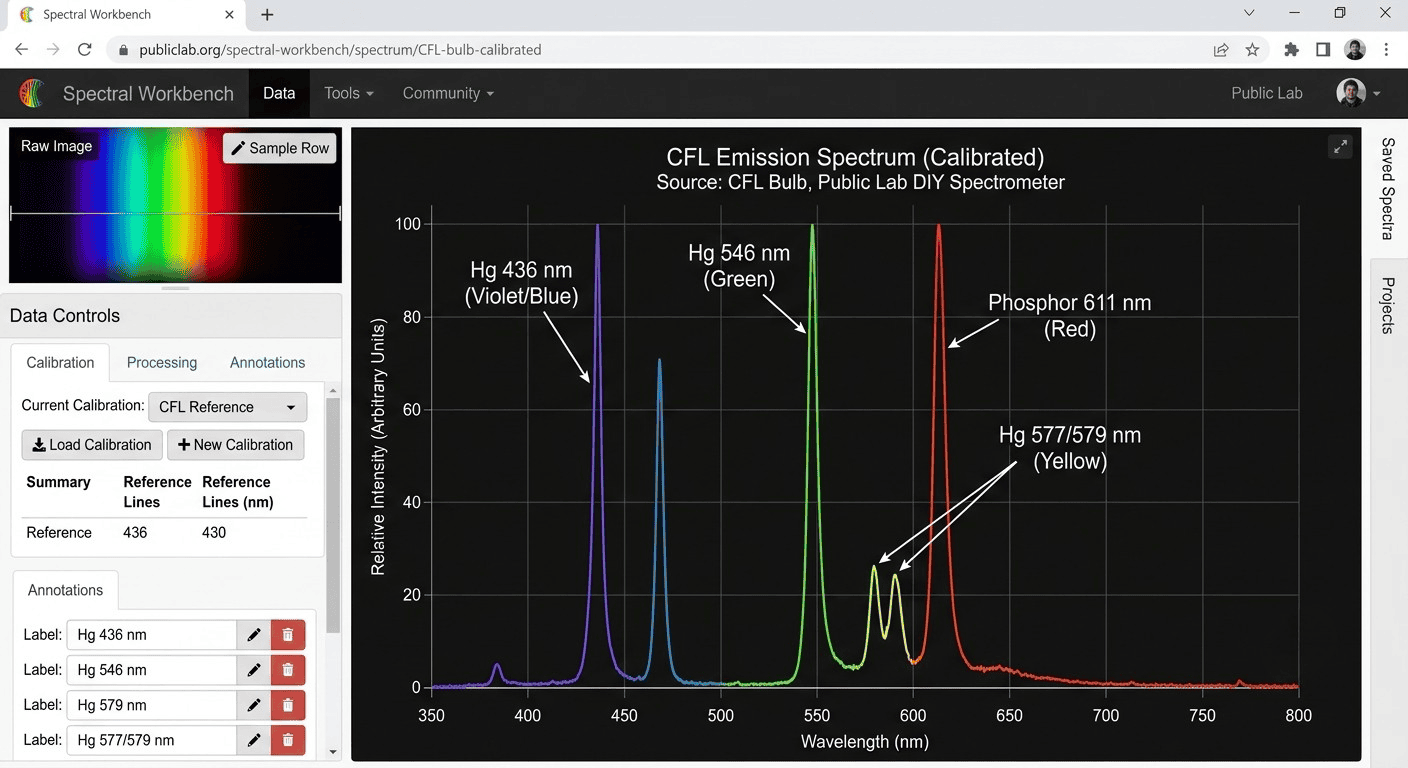
Option 1: Spectral Workbench by Public Lab. This is the gold standard for citizen science spectrometry. Public Lab (a trusted community for open-source science) created a web-based platform where you can upload your spectrum photo, calibrate the wavelength scale using a known light source like a compact fluorescent bulb (which has distinct mercury lines), and then compare samples. It even lets you create absorption graphs. Head to spectralworkbench.org, create a free account, and you’re in business. This tool was built specifically for people just like us, and it’s one of the most powerful citizen science tools available online.
Option 2: Theremino Spectrometer or ImageJ. If you prefer offline work, the Theremino system provides a free Windows application that works with webcam or smartphone photos. ImageJ (or Fiji) is a general image analysis software where you can extract a line profile from your spectrum photo and plot it in a spreadsheet. I find ImageJ has a steeper learning curve but gives you total control. For most of your water testing and plant pigment explorations, Spectral Workbench will feel like a warm hug from a nerdy friend.
External link for deeper learning: Visit Public Lab’s spectrometry page at [https://publiclab.org/wiki/spectrometry](https://publiclab.org/wiki/spectrometry) for community builds and calibration techniques. (Trusted, non-commercial source.)
Calibrating Your DIY Spectrophotometer with Household Items
A spectrometer isn’t much use unless you know which pixel corresponds to which wavelength.
Calibration is easier than you think. If you used Spectral Workbench, the software asks you to photograph a known light source.
A compact fluorescent lamp (CFL) is perfect because it has sharp emission lines at 436 nm (blue), 546 nm (green), and 611 nm (orange-red). You snap a picture of the CFL’s spectrum through your instrument, upload it, and tell the software where those known peaks are. It then maps all the pixels in between. Your DIY spectrophotometer is now a real measuring device.
What if you don’t have a CFL? Some folks use a neon indicator light, or even the natural absorbance peaks of a substance like chlorophyll extract (which has known peaks around 430 nm and 662 nm).
One creative method: mix water with a few drops of green or blue food coloring, and use a commercial spectrophotometer at a local maker space or school to create a reference curve.
Once you’ve calibrated, you can reliably measure unknown concentrations. The key is to never change the geometry of your box, light source, or camera position after calibration. Lock it all down with tape and love.
Your First Citizen Science Experiment: Measuring Water Quality
Now that you’ve built and calibrated your DIY spectrophotometer, let’s put it to work.
One of the most impactful things you can do with your gadget is test water for common pollutants or nutrients. Nitrate and phosphate runoff from agriculture can harm local streams, and your homemade device can detect them using simple color-change test kits.
Here’s the idea: you use a commercially available aquarium test kit that turns water a shade of pink or blue when nitrates or phosphates are present.
Instead of matching the color by eye to a printed chart (which is subjective and often inaccurate), you place the reacted sample in your spectrophotometer and measure its absorption at the appropriate wavelength.
Compare to a blank of distilled water treated identically but with no sample. The deeper the color, the higher the concentration. By preparing a few standard solutions of known concentration, you can create a calibration curve and determine the exact ppm of your local creek.
That’s real, actionable citizen science.
(If you’re passionate about water quality, I’ve written a whole post on building a low-cost water monitoring kit)
External resource: The EPA’s volunteer monitoring guide offers methods that align perfectly with spectrophotometric measurements: [https://www.epa.gov/volunteer-monitoring](https://www.epa.gov/volunteer-monitoring). Always pair your data with documented methods for credibility.
Exploring Plant Pigments and Photosynthesis
Your DIY spectrophotometer isn’t just for water, it’s a window into the hidden colors of plants. Ever wondered why leaves turn yellow in the fall?
You can actually measure the decline of chlorophyll and the rise of carotenoids. Crush a green leaf with some rubbing alcohol or acetone (in a well-ventilated area), filter the liquid, and pop it in your sample holder. You’ll see sharp dips in the spectrum at the blue and red regions where chlorophyll absorbs strongly. Compare that to a yellow leaf extract, and you’ll see those dips shift.
This is a stellar experiment for students, gardening enthusiasts, or anyone curious about the rhythms of nature.
You can also measure the antioxidant content in foods.
The Folin-Ciocalteu assay, for example, produces a blue color proportional to phenolic compounds. While it requires a reagent, it’s accessible and your device can quantify the results far more accurately than a visual guess.
There’s something deeply satisfying about proving that your homegrown blueberries pack a bigger antioxidant punch than store-bought ones, and your DIY spectrophotometer gives you the data to back it up.
(For more plant science project ideas, check out my article on gardening with sensors)
Taking It Further: Building a Spectrophotometer with Arduino and a Sensor
If you love electronics, you can take your build spectrophotometer skills to the next level by replacing the smartphone camera with a light sensor and an Arduino.
The TSL2591 digital light sensor can read light intensity across the visible spectrum when paired with different colored LEDs as narrow-band sources. Or, use a small linear CCD sensor like the TCD1304 to capture a whole spectrum in one shot.
While this requires some coding and soldering, the result is a standalone instrument that spits out absorbance values directly, no phone alignment needed. This opens doors to precise, repeatable measurements and makes you feel like a mad scientist in the best possible way.
For those wanting to dive in, I recommend checking out the open-source project “DIY Spec” by IO Rodeo, which uses the AS7262 six-channel spectral sensor.
It’s a fantastic bridge between the simple shoebox version and a full lab instrument. The community around these **citizen science tools** is incredibly generous with sharing code and designs.
External link for hardware details: The IO Rodeo DIY spectrophotometer page at [https://iorodeo.com/pages/colorimeter](https://iorodeo.com/pages/colorimeter) provides schematics and tutorials.
Troubleshooting Common Hiccups (Because Science Is Messy)
I’ve built a few of these, and I’ll be honest: the first attempt is rarely perfect. Here are some bumps you might hit and how to smooth them out:
I just see a bright blur, no clear rainbow. Check that your slit is narrow and sharp. A clean cut with a razor blade and black paper works wonders. Also ensure your diffraction grating is close to the slit and the grooves are vertical.
My readings change every time I put the sample in. Consistency is king. Always place the cuvette with the same orientation. Mark one side and always face it toward the light source. Use the same volume of liquid. Your blank and sample must be treated identically.
The spectrum is too dim. Try a brighter LED or move the phone closer. If using a DVD grating, check that you’re using the clear layer—sometimes the metallic reflective layer is still on, blocking light.
Calibration is off, peaks don’t match known values. Your geometry shifted. Even a slight bump to the box can change the pixel-to-wavelength mapping. Calibrate right before your measurement session and don’t move anything.
Remember, every hiccup is a lesson. Your DIY spectrophotometer is a living project that you’ll tweak and improve, and that’s where the real learning happens.
Joining the Citizen Science Community
You’re not doing this alone.
When you build spectrophotometer instruments and share your data, you become part of a global movement. Platforms like Public Lab, CitSci.org, and even local Meetup groups are full of people who want to see your results and help you improve. I’ve found that posting a picture of your build on social media with the hashtag #DIYspectrophotometer opens a floodgate of tips and encouragement.
If you end up monitoring a local waterway, connect with your local watershed association, they’re often thrilled to have community-collected data.
(Need inspiration for other ways to contribute? I wrote a piece on getting started with citizen science no matter your background)
Summary: Your DIY Spectrophotometer Is a Gateway
Let’s pause and take stock. We’ve covered how a DIY spectrophotometer works using a light source, a sample compartment, a diffraction grating, and a smartphone detector. You learned to build one from a shoebox and a piece of DVD, calibrate it with a household CFL bulb, and use free software like Spectral Workbench to analyze your samples.
You’ve got real experiment ideas for water quality testing and plant pigment analysis, and you know the common pitfalls to avoid. Most importantly, you’ve seen how this homemade gadget isn’t just a toy, it’s a serious, scientifically valid instrument that empowers you to ask questions and get answers about your environment. T
hese citizen science tools put the power of discovery directly in your hands, and I can’t wait to hear what you explore.
Let’s Build Something Amazing Together
I truly hope this guide sparked that tinkering spirit in you.
Whether you’re a teacher, a parent, a retiree, or just a curious soul, building a DIY spectrophotometer is a project that keeps giving. It’s science you can hold, share, and use to make a difference.
I’d love to see your creations and hear about your experiments. Got questions? Stuck on a step? Want to share the graph from your first water test? Reach out, I’m here to help.
Contact us at [[email protected]] for inquiries, troubleshooting, or just to say hi.
Until next time, keep shining that light.